
Before I tell you how, let me give you a quick lesson is search engine optimization (aka SEO). There are two main components: “off-page” and “on-page” optimization. “Off-page” SEO refers to tactics such as link building. The more websites that


 judge a book by its cover is such a trite adage. While there’s merit to it, most people—especially in the blogosphere—don’t heed it. An ugly blog with scrunched up images and missing links aren’t going to get awards. Similarly, readers who come across boring blog post titles will say, “Meh,” and go back to Facebook. Like it or not, your post title is your book cover, and unless it’s made of gold, your post will go unread, unappreciated, unloved.Make sure your posts get the love they deserve by giving it an appropriate title.
 Every time you write a post on your blog you have the option to add some Labels to that post.While most Bloggers don't give much thought to the labels they use and some don't add any labels at all they can be very beneficial to your blog in a number of ways, but only if used correctly.Using labels in the correct manner can help your blogs performance in Search, leading to more traffic and labels can be a great way for visitors to navigate your blog keeping them browsing through your archive.So by simply following a few rules and putting some thought into the labels you select you can get more traffic to your blog and increased page views from that traffic.
 |
| BestBloggerTemplates.Net Labels |
 It is said that “The better the keyword density, the higher your page ranking or higher search engine rankings may be”. High Search Engine Rankings can be obtained only by producing keyword rich content. To ensure high search engine rankings one has to properly optimize his post such that a particular set of keywords attain the maximum density in the post.
With millions of Internet pages all trying to capture the same reader’s attention, it is more than important to rank highly on search engines. The best way to climb in rank and get high search engine rankings is with the appropriate keyword density. Checking a text’s or a Post’s keyword density is a quick and easy task. Textalyser – “Welcome to the online text analysis tool, the detailed statistics of your text, perfect for translators (quoting), for webmasters (ranking) or for normal users, to know the subject of a text. Now with new features as the analysis of words groups, finding out the keyword density, analyze the prominence of word or expressions and thus ensure high search engine rankings. Webmasters can analyze the links on their pages”. Tip : If you are concerned about how your website or Blog’s Search Engine Rankings for specific search phrases, but have never used a keyword density analyzer, the Textalyser is what you are missing. So, next time remember about search engine Optimization in Posts of your Blog Hope these tips will get you High Search Engine Rankings. What do you think, Which phrase has been repeated in this Post to ensure High Keyword Density and which phase in this Post will help me in high search engine rankings.
Ensure High Search Engine Rankings
How to get High Search Engine Rankings
Alexa.com is a subsidiary of Amazon.com, which includes a meter traffic and importance of a given web page, as with Google PageRank. Recently, I wrote an article on how to optimize the google pagerank . The Alexa ranking usually increases according to the number of users who visit a given page with the Alexa Toolbar installed.
The increase in Alexa Ranking is important only as a commercial vehicle. Networks and many webmasters are concerned about the Alexa ranking of pages in that they use it as an indicator of the value and relevance of a given page.
Probably some of the ways and techniques to improve the Alexa ranking has been described in this first article. Only in this way is that you will attract readers and users interested in learning it. Increasing or improving the rankings is important, but never forget that more important than that is your audience. Work with her and for her, with quality and dedication. The rankings are the work of background.
Install the Alexa toolbar – As already mentioned, install the Alexa toolbar will help you increase your own ranking Alexa. Set as your home page, because that will make you also add a few extra points.
Place the widget on the Blog Sidebar – Placing the widget helps Alexa by the promotion of the service and increase your ranking. Every page view is counted by the widget making Alexa update your blog’s rankings more quickly.
Use Alexa redirection – Try putting this link on your websites http://www.alexa.com/data/details/traffic_details?url=http://www.xyz.com , by replacing the address of your website or blog. You can place the link or hidden at the end of each post for example. Each click will be counted as a visit and is told only 1 visit per IP.
Optimizing posts old – If you have any post older, receiving tens or hundreds of visitors every day, because it is well positioned in search engines, enjoy it by putting a widget or a link to the Alexa ranking.
Talk to the administrators of local cybercafes – and propose a monthly or annual plan to install the Alexa toolbar on all computers, and set your blog as homepage. Although this type of agreement is not as easy to achieve, results are very interesting and positive.
What do you think of improving Alexa ranking ?
When people give advice on increasing blog traffic, usually they will tell you things like: "Write what you know" or "Send good posts to higher traffic blogs" or some such thing. Sure, that work on occasion, but I’ve found that Increasing the Traffic to a Blog requires some Skills which you Must Acquire and Know About…
Skills or Things that Should Be Known. I have seen for the past few Days I have been following my own articles which I wrote and Has Definitely Boosted My Blog Traffic. Hope these Articles will Help you a Lot in Increasing your Blog Traffic. Do Write in your Comments …
Previously, I had posted about how to improve alexa ranking for new blogs. Today, I have a very interesting Article for you which will help you to Find How much Traffic a Site Gets using Traffic Details from Alexa.
Step 1 – Go to http://www.alexa.com/siteinfo/xyz.com (Replace xyz.com with your Site Name) . Click Reach
Step 2 – Find the “1 month’s Avg” (one month’s average) See Pic Below.
Here My Blogs “1 month avg” = 0.00125
Step 3 - Multiply the figure with 545454
For Eg. I am multiplying my own 1 month avg with 545454. ie 0.00125 x 545454 = 681 (daily unique visitors). Wow this is almost 90% accurate.
For My Old Blog Realtrix ie, 0.00278 x 545454 = 1518 (daily unique visitors). That’s again 96% accurate.
Similarly I found Amit Agarwal’s Labnol.Org is 0.0296 x 545454 = 16,145 (daily unique visitors). I don’t know how accurate it is but seems accurate upto 60%. I have heard labnol gets more than 30k visits per day.
PS : I can’t guarantee that the results will also be positive for all sites. But its worth a try.
So, What Your Alexa Say ? Reply in Comments…
Facebook is a really nice way to get traffic to your blog. Traffic from Facebook mainly means your friends visiting and people searching on facebook. So it implies only certain category of posts will attract traffic from facebook.
Although I don’t get any visits from facebook on my daily tech related posts. But some posts work well. The 3 post which gave me a good number of hits are Bollywood Bloggers in India, Register for MTV Roadies Battleground and Why Obama is the Coolest.
Well these posts are very much Offtopic but atleast they gave me some traffic from facebook friends and users. Hence I suggest that your submit your blogs’ feed to your facebook notes, so that your facebook wall is updated automatically updated when new posts are published in your blog.
How to Add Blog Feed to Facebook Notes and Publish The Automatically in your Facebook Wall
If you haven’t placed your blog feed to facebook can follow the steps below :
Login to your facebook account, point to Tab Settings on the menu bar, and then select Application Settings.
On the page appears, click the application of Notes.
Find Notes Settings on up right, and then click Import a blog.
On the page of Import an External Blog enter your blog feed address into the Web URL (For eg: http://www.telabela.com/feed)
Then click Start Importing button. On the page appears, click Confirm Import at the bottom of the page.
After This whenever you post something in your blog it will be updated to your facebook wall automatically. A Nice way to promote your Blog. Very Helpful if you have large number of friends in your facebook friend list.
Your Comments are necessary in this Post.
Recently, one of my friends was being Bugged with some Sort of Annoying Scraps being send by some unknown person. Even I had this problem once when a guy was sending me loads of “unwanted” and Irritating Scraps. In case if you are facing the same you should know How to Stop Someone From Sending you Scraps on Orkut ?
Previously, on orkut there wasn’t much options for your orkut security. But now, a lot of strict measures & new security measures along various Privacy Options on orkut have made orkut a bit more Safer.
Getting Back to the Topic, Well you can Easily Stop an Unknown person from Sending you Scraps Just By Ignoring Him/Her.
How to Ignore someone on Orkut ? Step 1 : First go to his/her profile, a look for more » in the profile
(given just below the display pic – see screenshot – left)
Step 2 : Then click on more » . After clicking it will bring up a few Options (see screenshot – right)
Step 3 : Now, Click Ignore User from the list.
(see screenshot – right)
Step 4 : Finally, that person will be in your Ignore List.
(see screenshot below).
This means he/she won’t be able to scrap you or send you unwanted friend requests any more.
Facebook Friends Checker userscript for firefox regularly checks your Facebook friends to check
whether anyone has removed you from their friends just to find who stops following you on twitter.
Requirements : Firefox, Facebook Friends Checker, keeps track of when you get removed from
someone else’s friend list by regularly checking to see exactly who is de-friending you.
When the script detects that someone you used to be friends with is no longer one of your friends,
a message will appear informing you about who it was and giving a link to their profile page.

The script checks by default once per hour when on Facebook, but this time can be increased through :
Tools > Greasemonkey > User script commands… > Set time interval to check for removed friends…
> Facebook Friend Checker Script : Install.
Previously, in post about enhancing facebook user performance we
mentioned that one could hide status updates from friends or applications they disliked.
But, in case you want them back here is a quick guide to unhide status updates, notifications
of friends and apps. in the news feed (home page).


Now, you will be able to unhide the status messages you were missing out from your news feed.
The best thing I like about facebook updates is their Notification system which alerts you whenever
someone comments, posts on your wall replies etc. anything related to you. So if you want to stay more
connected to your facebook notifications the best way would be to generate a rss feed of
your notifications and subscribe it via any rss reader.
Step 1 : Login into your FB account.
Step 2 : Go to facebook.com/notifications.php. It will open an daily archive of your notifications.
Step 3 : On your right you will see a subscription box with two ways to subscribe to the notification feed. 
Step 4 : Select the subscription method you like. To Subscribe via Google Reader etc click "via RSS".
Step 5 : Now add that feed generated to Google reader or any other feed reader you are using.

That’s All. Now you will receive your facebook notification updates right in your RSS reader.

Many People have Asked me this ,and today after Prateek asked “how to add
which you have added to end of your blog posts.” , I decided to Post it here.
Adding this will increase the chances of visitors to subscribe to your blog feeds hence improve your Blog Traffic.
Step 1 : Its really simple, Just add the Following Code from the Text File given Below…
Copy The Code : EmailSubscribeButtonCode.txt – Click
Step 2 : Now look for <p><data:post.body/></p> in the template. Make sure to “Expand Widget Template” in the Edit HTML page.
Now add the code given below, just beneath <p><data:post.body/></p>
Save your Template.
Step 3 : Now in the template Look For
http://www.feedburner.com/fb/a/emailverifySubmit?feedId=1671967
This is my blog’s Feed Burner Subscription link. Replace This with yours.
Ok, Now Save your template… If you face any problems freely ask in the Contact Form Below.
 If you
<div style=’float:right; margin-left:10px;’>
<script type=’text/javascript’>
digg_url = ‘<data:post.url/>’;
digg_window = ‘new’;
</script>
<script src=’http://digg.com/tools/diggthis.js’ type=’text/javascript’/>
</div>
Enjoy !! ..
Use The Comment Box below if you have Any Queries.
I installed this widget today and I must say its really working Well for me. A Simple hack but really a Must Have for all your Blogs. This widget show the total number of Blog Post Published and the Total number of Comments In your blog.
Well, one good this is that more people are subscribing to my Blog Feeds after adding this to my Blog. See Pic Below. Follow the Steps Given Below to Install the Widget : <script style="text/javascript"> 7.Remember to replace the text "yourblog" with your blog address. Note that you replace it in two locations. You will see a small widget in your sidebar with the "Total Posts" n "Total Comments".  1.Log in to your Blogger account.
2.In your Blogger Dashboard, click on the "Layout" link.
3.This will bring you to the "Page Elements" tab. Decide where you want to insert the statistics widget and click on the "Add a Gadget" link accordingly.
4.Scroll down the list and click on "HTML/JavaScript" button.
5.This will open the "Configure HTML/JavaScript" window. In the title section, please type "Blog Statistics" or "Blog Information" or "Blog Data" or any title you wish to.
6.In the content section, copy & paste the following code exactly:
function numberOfPosts(json) {
document.write(‘Total Posts: <b>’ + json.feed.openSearch$totalResults.$t + ‘</b><br>’);
}
function numberOfComments(json) {
document.write(‘Total Comments: <b>’ + json.feed.openSearch$totalResults.$t + ‘</b><br>’);
}
</script>
<ul><li><script src="http://yourblog.blogspot.com/feeds/posts/default?alt=json-in-script&callback=numberOfPosts"></script></li>
<li><script src="http://yourblog.blogspot.com/feeds/comments/default?alt=json-in-script&callback=numberOfComments"></script></li></ul>
<center><span style="font-size:75%;"><a href="http://www.snaphow.com/" rel=”dofollow”>Get This Widget</a></span></center>
8.Click on "Save" button and Check your blog.
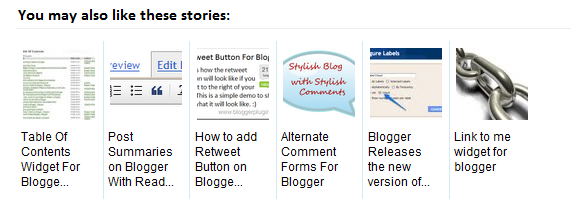
Displaying the links to related posts along with a thumbnail of the
corresponding post will help you increase the page views/user .Users will be tempted to go for the
related posts when they are presented attractively with thumbnails.
This is another first release from me.This one also uses the media thumbnails generated by blogger for each post.
For displaying the thumbnails,this widget will use the images uploaded for the post using the
blogger image uploader(from the post editor) [Update - Now supports external images also.]
Here are the detailed steps to install the related posts widget for blogger with thumbnails
1.First of all Login to your blogger dashboard and navigate to Layout > Edit HTML and
check the "Expand Widget Templates" check box
2.Now look for
</head>
and replace it with
<!--Related Posts with thumbnails Scripts and Styles Start--> <!-- remove --><b:if cond='data:blog.pageType == "item"'> <style type="text/css"> #related-posts { float:center; text-transform:none; height:100%; min-height:100%; padding-top:5px; padding-left:5px; } #related-posts h2{ font-size: 1.6em; font-weight: bold; color: black; font-family: Georgia, “Times New Roman”, Times, serif; margin-bottom: 0.75em; margin-top: 0em; padding-top: 0em; } #related-posts a{ color:black; } #related-posts a:hover{ color:black; } #related-posts a:hover { background-color:#d4eaf2; } </style> <script type='text/javascript'> var defaultnoimage="http://1.bp.blogspot.com/_u4gySN2ZgqE/SosvnavWq0I/AAAAAAAAArk/yL95WlyTqr0/s400/noimage.png"; var maxresults=5; var splittercolor="#d4eaf2"; var relatedpoststitle="Related Posts"; </script> <script src='http://blogergadgets.googlecode.com/files/related-posts-with-thumbnails-for-blogger-pro.js'
type='text/javascript'/> <!-- remove --></b:if> <!--Related Posts with thumbnails Scripts and Styles End--> </head>
3.Now Find
<div class='post-footer-line post-footer-line-1'>
If you cant find it then try finding this one
<p class='post-footer-line post-footer-line-1'>
Now immediately after any of these lines(whichever you could find) place this code snippet
<!-- Related Posts with Thumbnails Code Start--> <!-- remove --><b:if cond='data:blog.pageType == "item"'> <div id='related-posts'> <b:loop values='data:post.labels' var='label'> <b:if cond='data:label.isLast != "true"'> </b:if> <script expr:src='"/feeds/posts/default/-/" + data:label.name +
"?alt=json-in-script&callback=related_results_labels_thumbs&max-results=6"' type='text/javascript'/></b:loop> <script type='text/javascript'> removeRelatedDuplicates_thumbs(); printRelatedLabels_thumbs("<data:post.url/>"); </script> </div><div style='clear:both'/> <!-- remove --></b:if> <b:if cond='data:blog.url == data:blog.homepageUrl'><b:if cond='data:post.isFirstPost'> <a href='http://www.bloggerplugins.org/2009/08/related-posts-thumbnails-blogger-widget.html'>
<img style="border: 0" alt="Related Posts Widget For Blogger with
Thumbnails" src="http://image.bloggerplugins.org/blogger-widgets.png" /></a>
<a href='http://bloggertemplates.bloggerplugins.org/' ><img style="border: 0" alt="Blogger Templates" src="http://image.bloggerplugins.org/blogger-templates.png" /></a> </b:if></b:if> <!-- Related Posts with Thumbnails Code End-->
4.You can adjust the maximum number of related posts being displayed by editing this line in the code.
var maxresults=5;5.To edit the title of the widget you can change this line of code
var relatedpoststitle="Related Posts";
6.To change the default thumbnail, you can edit this line of code
var defaultnoimage="https://blogger.googleusercontent.com/img/b/R29vZ2xl/AVvXsEh3Z5B80kWiHZ2iOkn5tu3XBWO9KWgZctlYwMqztjwAyVhZdq8b72C2z5sa5eu_yLuTZyYRbieSCgpvQpN-OrPezGPkaAiD6Ajlj34LyUvNbWtVh2s2X_s9DlQPnBU1hBiYA2KZ3sTYetc/s400/noimage.png";7.To Change the Colour of the Splitter Line , edit
var splittercolor="#d4eaf2";To change the other colours and all you will have to modify the CSS
If you fall into troubles implementing this,don't panic.. :) .
just leave me a comment here and i will help you out. If you like to give me any suggestions on
how to improve this widget,then it would be really great.
Just remove the two lines starting with <!-- remove --> from both step 3 and step 2.
that is lines
and
A relatively easy method of increasing page views on your blog is to add a list of related posts below each article or displaying them in the SideBar. Now there is a Related Post Plugin for WordPress but there is no such one officially available for Blogger. So here is the Solution. This offers readers a ready-made reading list of other articles on your blog, which are of a similar theme or subject matter.
The new sidebar widget will be created at top of your sidebar, you may want to move it a better place. Remember to save. Tip: You actually can drag this sidebar widget and drop onto after Blog Posts widget, then this widget will show up after comments.
You have to see it in action in single post, you will not see the Related Posts list in your home page of your blog. Just randomly choose one of your blog post.
Step 1. Go to Layout/Edit HTML/Edit Template Step 2. BACKUP your template! Do not skip this! Step 3. Check Expand Widget Templates, then Find a block like:
<div class='post-footer-line post-footer-line-3'/> ...</div>
Step 4. Add one more line to be:
<div class='post-footer-line post-footer-line-3'/> ...</div><div id='related_posts'/> Step 5. Go to the end for:
</body></html>
Step 6. Add two more lines to be:
<script src='http://www.google.com/jsapi'/><script src='http://brps.appspot.com/brps.js' type='text/javascript'/></body></html>
Depending Upon whether you install the Related Post Blogger widget in the Sidebar or Below the Post, you can also make customizations according to your Need by looking Below. Enjoy !!
By default, if your blogs are written in English, you should be more likely having no need to customize the widget title. However, if your blog is not a normal blog or not in English. For example, it's a food/cuisine/etc or written in Japanese. You could set the title to Related Recipes or 関連記事 (translated by Google Translate). Here is how you can do that: Change the original code:
<script src='http://www.google.com/jsapi'></script><script src='http://brps.appspot.com/brps.js' type='text/javascript'/>
into
<script src='http://www.google.com/jsapi'></script><script type="text/javascript">window.brps_options = { "title": "<h2>Hey! Check out my other related posts!</h2>" "max_results": 5 }</script><script src='http://brps.appspot.com/brps.js' type='text/javascript'/> Notice that we have a new <script> block. You can also use HTML in it, you may need to as shown above since normal Blogger widgets use <h2> as title. If you don't use, the widget may look different. "max_results": 5 = Number of Related Posts you Want to Show
The DOM looks like:
div#related_posts h2 /* By default. If you customize brps_options["title"], it will be whatever you set */ ul li
If you want to set CSS of every related post item of list:
#related_posts ul li { /* CSS here */ font-family: Arial; font-size: 1.2em; font-weight: bold; color: #888; } If you want to set CSS of default title of list:
#related_posts h2 { /* CSS here */ }

|

|

|

|

|
