Showing posts with label Blog. Show all posts

Tuesday, November 8, 2011

google wave in blogger?Image based tutorial


I do not know if many people use it but we'll see how to insert a wave on a blog as a widget so that any visitor can use it. Tell them that this wave will only be visible and may be used by visitors using Firefox or Chrome.

How to embed  Google wave in blogger as widget?Image based tutorial

Step[1]Create a wave in your wave client by clicking on new wave button.
Click Image to enlarge
Step[2]You will be asked to add any email address to a wave

Displaying total number of posts and comments to blogger


Many old bloggers display their total posts and comments just to show how popular their blog is. You can too add this widget to your blog. The widget looks like this:

Total Posts And Comments Widget

To add this widget follow these simple steps:

Add Flash Files to your blogger


Adding flash to blogger or adding .swf files to blogger.
Flash files having .swf extensions can be added to blog posts,if you have got the embed code for the same..The best example is the youtube embed code!!IF u want to add flash to the blogger tile.In that case you will have to edit your template and add the flash embed code there..

See a sample of what can be done below, doesn't this look cool!
Read on to see how it's all done.
Now see What i have doen Above.
In my one of the previous articles i showed you how to add music files to blogger.
Adding flash is somewhat similar to it.
The code i have used for above flash file is:

Adding animated GIFs to blogger


One of the main annoying limitations of blogger is that it does not allow to post animated gifs to the post. The good news is that the Picasa Web Albums , Google service where you stored the images posted on Blogger supports animated images in GIF format.

Change color and size of default tag cloud in blogger


It is known that we can use a gadget option "Labels" to Blogger, to show our tags in a cloud . It so happens that yesterday I received two emails on the same subject: how to change the design of the cloud once added to the blog, so we'll see in this post how.

blogger tag cloud
Once you add a gadget in the sidebar, a tag cloud will have a default layout that fits, more or less to the rest of the sidebar.

Friday, April 15, 2011

Free Tools and Services for Bloggers Part 3


contentBloggers do not just write articles! They have to do a lot of things to manage and promote their blogs. These activities range from commenting to finding useful design and software tools. Often such tools are life savers, allowing more time for the business of writing and keeping readers happy. But at the same time, finding perfect tool for a task is difficult and time consuming. So, we searched internet for best free blogging tools and services for bloggers and summed them up in this post.


Content:

Image Credit: ABContentOnline.com
  1. Zemanta: Zemanta is a content suggestion tool that searches for related content (articles and pictures) around the web and also suggests tags and links. Zemanta has been one of our favorite plugins here on Blogging With Success. Recently, Zemanta announced support for Opera, Safari and Chrome. With this, major browsers are covered and it can be considered a complete solution for bloggers.
  2. Copygator: Search web for duplicate copies of your content. Also gives a subscription option so that you can stay updated via email about scrapping.
  3. OpenOffice.org: It is a free open source alternative to Microsoft Office. Do not worry, it works with Office files. OpenOffice.org Write, the word processor lets you export files and PDF and retains links. Useful for creating e-books with links. Note: This is not an online tool.
  4. Ping-O-matic: Automatically pings(notifies) online services about your blog updates.
  5. Pingoat: Another automatic pinging service.
  6. LinkWithin: A related posts widget/plugin for Blogger, WordPress and other platforms. No signup, no ads. Just place code and related posts from archives will be shown under posts.
  7. BlogThis!: Add to Firefox browser, a toolbar to access to Blogger’s ‘blogthis’ feature where you can  make a blog post without visiting blogger.com. Use this interface from a page or article you want to ‘blog about’ — it seeds the draft post with highlighted text, the website url and any other text you want to key in, on the spot. Works with Firefox and Internet Explorer.
  8. StumbleUpon:  Browser toolbar lets you discover web sites based on your interests and refer them to your SU friends.

Design:

  1. BrowserShots: BrowserShots is a free website that lets you get screenshot of any website. More than 70 browsers are available and you can request any number of shots for free.
  2. FireShot: A Firefox or IE extension that lets you create customized screenshots of your web pages. There are tools that let you edit the snapshot and add text annotations. This software is good for web developers, and for communicating unique graphics to your blog readers. Captured & edited images can be downloaded as png, jpg, gif or bmp formats or uploaded to a free public screenshot host.
  3. MoFuse: Mofuse lets you create a mobile friendly version of your website for free. You can customize colors, logo and even put ads on it without paying a penny.
  4. DaButtonFactroy: Lets you create buttons for your blog. You can customize almost everything from background shadow to text and colors etc. Here’s a demo button:
    button
  5. Favicon.cc: Lets you create a free favicon. You can even add animation.Here’s a tiny animation by Mr I (as he admits, not a big artist, so no wonders here.)
    favicon
  6. WordPress Theme Generator: Lets you make your own two/three column WordPress theme for free. Colors, header image and width of sidebars can be changed.
  7. PsycHo Free Template Generator: Generates Blogger template. You can customize number of columns, color scheme etc. Note: This tool is being redesigned and new version will be online soon.
  8. I Like Your Colors: Like colors on webpage and want to know HTML codes for them? This tool extracts all the colors from a given page and shows the corresponding hexadecimal values.
  9. ColorZilla: This is a Firefox addon that uses an eye dropper icon as a color-picker. Get color codes for anything on any webpage. Also use there different color palettes and select or compose the right color you want from a slide rule for hues and saturation. You can also zoom any online page! Useful for those tiny font messages you might get, which someone forwarded from a mobile device.
  10. Firebug: Yet another Firefox addon with a wealth of development tools that let you edit, debug, and monitor CSS, HTML, and JavaScript on any web page.
  11. CSS Portal : An excellent guide on using Cascade Styling Sheet elements to format text inline, overriding your template defaults.
  12. Easy Calculations: Use this to convert colors form RGB to hex and vice-versa.
  13. WebDeveloper: A menu and a toolbar extension for Firefox with various web developer tools that  allow you to  analyze all the different parts of a web page, including the CSS per element and outline objects. You can edit CSS on the screen and save the code to later update the template.
  14. Degraeve.com: This software generates a palette of colors that match and complement any image your provide. You can match theme colors to a key component in your header for example.
imagepalette

Sunday, April 10, 2011

Website navigation and duplicate content


Website navigation and duplicate content

Duplicate content is currently a hot topic in SEO community and It seems duplicate content issue would not be going anywhere in next 2 , 3 years.

Blogs and Websites with the very little amount of content may in future face Google penalty because of high amount of internal duplicate content.

I compared my homepage with other pages of my site and I got quite shocked to found that the ratio of similar content is above 70%, some pages of my site with very little content like video and image posts have 94% similar content ratio. This is because of my sites navigation and the widgets I'm using on my blog which remains same for every post and are also present on homepage. Search engines index whole pages which includes navigation and widgets text also, so posts with no content having only few images and video can make matters worse for you.

Here are Few tips to reduce duplicate content


  • Use JavaScript or Ajax to output content that you may think is mandatory but is creating duplicate content issues
  • Try to remove unnecessary widgets.
  • Make your homepage unique.
  • Use JavaScript to output content that you don't want search engines to index.
  • Improve your site navigation and try to use only important and single keywords in your menus.
  • Use meta robot tag noindex on those pages which you don’t want google to index.


You can use this free tool to find similar content Similar Page Checker


If the ratio of similar content is above 50% you should need to worry and if it is above 70% You should follow above tips otherwise Google could penalize you or may be your individual post ranking will drop.


If you have suggestions and tips please share them with us. Thanks for Reading

Thursday, March 24, 2011

Wordpress and Blogger to post via G-mail


Sometimes, we are extremely busy or on the move and have less time to open our Blogger or Wordpress dashboard to update the blog. In this situation, you can use the option of e-mail posting. Normally, we all have e-mail access in our mobile devices. Fortunately, Wordpress and Blogger both support posting via e-mail. Let's see how to configure this option in both Wordpress and Blogger to post via e-mail.

Blog Posting Via Email


Posting via e-mail works on a simple principle. You send the blog post to a pre-configured address and your blogging CMS periodically checks for any e-mail to process (post). Let's start with Wordpress configuration.

WordPress Configuration


Although, Wordpress has in-built 'Post via e-mail' option in 'Settings -> Writing', but I prefer alternative solution, as it gives more flexibility for formatting and structuring the post.

First of all, we need Postie plugin.

Configuring the plugin

#1 - Upload the plugin to '/wp-content/plugins' folder. Activate the plugin.

#2 - Create two directories in the root directory (installdir) of your blog. Name these directories as 'wp-filez' and 'wp-photos'. Set 777 permissions for both directories. These directories will be used for temporary storage of data during e-mail processing.

#3 - Click 'Settings' and go to 'Configure Postie' page. You will be overwhelmed after seeing array of options on the page. Most of the options are pre-configured and do not require any modification.

#4 - The first option that we need to configure is 'Authorized Addresses'. In the given text box, add the e-mail addresses which you want to be treated as valid mails ids. Postie will treat each e-mail coming from these addresses as valid e-mails from admin. Keep each email address on a single line.

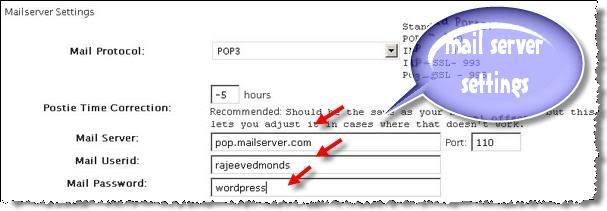
#5 - Now scroll to 'Mailserver Settings'. It is strongly advised to create a fresh e-mail id for posting purposes. Keep id name cryptic, for exp: er45t@yourdomain.com. Postie supports POP3, POP3-SSL, IMAP, IMAP-SSL protocols. Choose the appropriate protocol for your mail server from 'Mail Protocol'. Give the server address in 'Mail Server' and appropriate port number in 'Port'. Specify 'Mail Userid' and 'Mail Password' in respective text boxes.

Mail server settings

Note: If you are using POP3-SSL, choose port 995. For POP3, use port number 110. If you are unsure, refer to your mail server documentation.

#6 - Now the plugin is configured and ready for e-mail posting. But, there is something missing. We need to create some mechanism that triggers the e-mail checking procedure so that Postie can do its job. Well, there are two ways for doing that.

Method - 1: If you have access to cron, setup the cron job by the following code.


*/5 * * * * /usr/bin/lynx --source http://yourdomain/wp-content/plugins/postie/get_mail.php >/dev/null 2>&1

Keep this entry on a single line. This entry will run the file get_mail.php after every 5 minutes. You can adjust the time interval as per your requirements.

Method - 2: In case you have no access to cron, you can use this method. Paste the following code in 'footer.php'


<iframe src="http://yourdomain/wp-content/plugins/postie/get_mail.php?Submit=Run+Postie" name="mailiframe" width="0" height="0" frameborder="0" scrolling="no" title=""></iframe>

This code will automatically execute whenever a web page of your blog is opened. In case you want immediate posting after mailing, you can open your blog's homepage to get this code executed.

Post Formatting Options

Here comes the interesting part. Postie supports ample amount of options to structure and format the post, including the post metadata.

Categories and Post Title: While composing the e-mail for posting, you can specify the post title and categories for that post. Simple use this format in 'Subject' line.
Subject: Gen: Wordpress Hacks

This subject line will assign the post to the first category Postie will find, starting from 'Gen'. Needless to say, post title will be 'Wordpress Hacks'.
Subject: [14] [Tip] [Writ] Wordpress Hacks

This subject line will assign the post to 3 categories in one go. First one is the numeric id of the category, second one is the category starting with 'Tip' and so on...
Subject: -14- -Tip- -Writ- Wordpress Hacks

This is one more method to assign multiple categories and post title.

You can also specify, whether comments should be opened, closed or should be opened only for registered users. Use the following code to implement comment activation or deactivation.
comments:0 - (Comments are closed)
comments:1 - (Comments are open)
comments:2 - (Comments are open only for registered users)

If you do not specify any of the above option, comments will be open for all by default.

Postie also supports embedding images in the post via attachments. Refer to READ-ME file supplied with the plugin for all the formatting options.

To post via e-mail, simply compose the post in your e-mail client and send to one of the addresses configured in Postie. Processed e-mails are automatically deleted from the inbox by Postie

Blogger Configuration


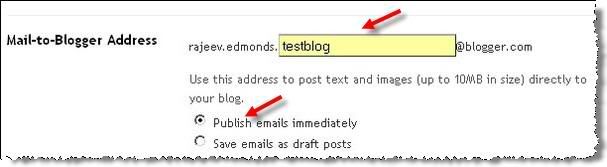
Configuring posting via e-mail in blogger is very easy. First, go to 'Settings', then 'Email' sub-tab. Fill in the id in the 'Mail-to-Blogger Address' field.

Post Via Email in Blogger

You can choose either to publish immediately upon receiving the mail or to save it as drafts. To post, simply send the post via e-mail to the address you have configured in your blog's dashboard. Interestingly, blogger can publish your HTML e-mail in original form with ease.

Over To You

Insert Ads Inside Blogger Posts[Only On Post Pages]


Ad placement is the most important thing which you should always keep in mind while Blogging. The better the ad placement, the better the click through rates. But Unlike Wordpress, Google Blogger doesn't have plugins which can make your tasks easier. So, you have to insert the codes into HTML yourself. Here is a screenshot of ads inside a blogger post. Note that it will not appear in the summary of the post on the main page.

Ads Inside Blogger Posts


 Here is a step by step instructions on How To Add Ads Inside Blogger Posts:

  • First Create an Ad(AdSense or whatever service you are using) of size that fits your need. I recommend you to create a 300 X 250 -OR- 336 X 280 ad. Now, parse it so that it can be used inside Blogger Template. To parse your ad code, click here and then copy your ad code to the box and then click on 'Convert Ad Code' button. Then copy the parsed code to a safe place.
  • Now Login To your Blogger Account, then go to Design>Edit HTML and then, using search function of your browser(Ctrl+F),
  • Search for <data:post.body>.
  • Now, paste one of the code above the code which you just found.
To Show Ads Aligned To Left, then ad this code:
<div style='float:left; margin-right:5px;'>YOUR ADSENSE CODE</div>
To Show Ads Aligned To Right, then add this code:

<div style='float:right; margin-left:5px;'>YOUR ADSENSE CODE</div>
Now, Copy Your Parsed Ad Code and replace 'YOUR ADSENSE CODE' with it.
Next, Save your Template by clicking on the 'Save' Button and check whether your ads are appearing or not.
Any Problem? Please drop your comment(s) and I'll help.


How to Stop or Unsubscribe from Feedburner Email Updates


Few time I receive emails from my blog readers asking me to unsubscribe them from email updates. I try at my best to reply to each email I receive, but time does not permit to reply to  each and every email and hence this post. Here I will be telling you the most simple way to stop Feedburner email updates yourself, neither you need to reply to the email saying “stop” nor you need to request the blog owner to unsubscribe your email address manually.

feedburner emails

Before I proceed, I must tell you that these email updates reach your inbox once a day (for each website) and the number of update emails might increase if you have subscribed to many websites. These emails carry the daily updates of a website to help you to have a quick eye on the entire day’s activity in a single email.

But what if you don’t need the Feedburner email updates anymore? Checkout the procedures to cancel Feeburner email subscription.

Stop / Unsubscribe from Feedburner Email Updates

  1. Open the update email sent to you by Feedburner
  2. FeedBurner Updates

  3. Scroll to the bottom of the email and click on the “Unsubscribe now” link
  4. feedburner email updates

  5. It will take you to the confirmation page, click on “Yes, unsubscribe me now” button
  6. cancel feedburner email subscription

  7. A confirmation message will appear saying that you have successfully unsubscribed from the feedburner email subscription
  8. unsubscribe stop feedburner email updates

  9. You are done.

Feedburner delivers a limited number of articles in each email and if the number of posts published in a blog are higher than it’s limit, it adds a note to the bottom of the email as “Message clipped… View Entire Message” like below screenshot.

Feedburner message clipped

If this is the case, click on the “View Entire Message” link and follow from the Step no – 2.

In this way you can also stop or cancel any other website’s subscription emails and unsubscribe from any future updates.

Wednesday, March 23, 2011

Learn How To Hack - Best Hacking eBook


Every single day there is some new news about how some popular website, government or public figure got hacked. Have you ever wondered how these “hackers” do this? I did, that’s why I got The Hacker’s Underground Handbook.

I wasn’t sure if it was for me since I know nothing about hacking or computer security, and was surprised when I saw how easy it was to follow along with the real-world examples and understand the material. I now know how hackers think and many of the techniques they use to take over websites like mine and yours… except I now know how to protect myself.

Learn How to Hack Linux, Windows, Websites, Passwords, Networks etc.

Some of the topic that were discussed in The Hacker’s Underground Handbook. were:

  1. programming
  2. linux
  3. password hacking
  4. network hacking
  5. wireless hacking
  6. windows hacking
  7. malware
  8. web hacking

After Reading “Learn How to Hack – The Hacker’s Underground Handbook” :

  • You will learn all the hackers underground tricks and learn to apply them in real world situations.
  • You will be put into a hackers mindset and learn to think like one.
  • By Learning how a hacker thinks and acts, you will be able to protect yourself from future hack attacks.
  • You will aquire knowledge nonexistant to 99.9% of the people in the world!
  • This Underground handbook may get you interested in pursuing a career as an Ethical Hacker.

I totally recommend The Hacker’s Underground Handbook. to anyone that’s interested in whats going on in these hacker’s minds and how they go about taking over all these big websites.

5 Awesome Websites You Should Visit Daily to Learn Valuable Topics


How many times do you find yourself at the computer doing absolutely nothing ? Here are some useful resources, websites you should visit daily for learning new stuff and feeding you brain with positive, useful information.

Utilize 10 Minutes Daily to Learn Useful Stuff, Gather Knowledge Online

1. Qwiki – Futuristic Talking Encyclopaedia, Search Engine

Qwiki - Futuristic Talking Encyclopaedia, Search Engine

Qwiki (Link) is an online search tool, information aggregator application which let you audio-visually learn about all sorts of topics. Type in a query and as if by magic, in seconds Qwiki prepares a multimedia presentation with voice, video, data charts and photos. And if you’re inspired, you can always choose to see the day selection.

Here is a quick example of how Qwiki works… (I searched for my city Kolkata)


Why I think Qwiki so unique is, apart from it being like a futuristic, rich experience with a voice narrating onscreen knowledge, text about the topic to you. In fact hence its a perfect wiki tool for your mobile device, tablet pc etc. With graphs, maps, visual clips and speech this is surely now one my daily sites. If you are knowledge hungry you’ll find Qwiki your favourite companion. Plus it can be a great learning tool for kids.

2. The Wikipedia : A Powerhouse of Textual Knowledge and Information

Who doesn’t know about Wikipedia ? It is a free, web-based, collaborative, multilingual encyclopaedia project supported by the non-profit Wikimedia Foundation. Its 18 million articles (over 3.5 million in English) have been written collaboratively by volunteers around the world, and almost all of its articles can be edited by anyone with access to the site.


Wikipedia currently supports content in 260 different languages and there are over 75,000 authors on Wikipedia, responsible for constantly maintaining and adding to the site’s database.

The pages of Wikipedia are under constant supervision by over 1,500 administrators. The problem with this is that when a person edits a page’s content with new information that has yet to be released to the public, said information is removed.


For example, when searching for an “Episode Guide” for your favourite television show, you’ll often find 10 to 20 future episodes and their descriptions; however, the administrators will remove all of the future episodes except for the one that airs the following week.

Most of the articles on Wikipedia can be edited by users that haven’t even registered an account on the site.

3. Improve Your English with BBC

 Learn Useful Stuff, Gather Knowledge Online

There are countless number of free online resources that offer english courses. Among them, the BBC Learning English has a huge amount of online learning material as well as a wide selection of games, quizzes, crosswords and other interesting flash games that will help you take advantage of your free time to give a boost to your English and keep up with the news alongside. 

4. Inspiring Speeches at TED

Everyone likes to know what’s coming in the future. And if you’re tired of unrealistic stuff shown in TV, then switch to the awesome TED videos. TED is a non-profit devoted to Ideas Worth Spreading. It as a conference bringing together people from three worlds: Technology, Entertainment, Design.

 Learn Useful Stuff, Gather Knowledge Online

TEDTalks (Link) shares the best ideas from the TED Conference with the world, for free: trusted voices and convention-breaking mavericks, icons and geniuses, all giving the talk of their lives in 18 minutes.

Some of my best talks from TED are:

5. Khan Academy: Free World Class Education Online

Khan Academy (Link) is a not-for-profit educational organization created by Salman Khan. With the stated mission of "providing a high quality education to anyone, anywhere", the website supplies a free online collection of over 2,200+ micro lectures via video tutorials stored on their youtube channel (link), teaching mathematics, history, finance, physics, chemistry, biology, astronomy, and economics.

 Learn Useful Stuff, Gather Knowledge Online

Students can make use of their extensive video library, practice exercises, and assessments from any computer with access to the web.

 

Khan Academy: Free World Class Education OnlineAll of the site’s resources are available to anyone. It doesn’t matter if you are a student, teacher, home-schooler, principal, adult returning to the classroom after 20 years, or a friendly alien just trying to get a leg up in earthly biology. The Khan Academy’s materials and resources are available to you completely free of charge.

Tuesday, March 22, 2011

Create an online survey for free


Online survey plays a very important role in improving a website or blog. Survey gives you a clear picture of what your visitors look for and how you can make that happen. Most of the website is not using a survey.  With Survey Monkey you can create free online survey, the only drawback  free users are not allowed to export the survey. Except export tool, survey monkey is a great source for creating free online survey and you can also link the survey to your blog or website. It offers user friendly interface and pretty simple. Follow the instruction to create online

Step 1

Visit surveymonkey website and register as free user. Create a survey is pretty simple. Enter a survey name to start creating survey

Step 2

Enter the questions, you need to display on your survey. 

Step 3

Once you are done with editing survey, click collect response and get the link code.

You are done. Now get more visitors by adding online survey to your website.

Facebook Hack: Hide your online status from certain people


Facebook recently gone for a revamp to make user experience much better than earlier. When it comes to chat, Facebook still lacks many features which is common on other chat applications. Many of us would have felt why Facebook chat lacks features like invisible mode, block list to block certain users. So hence I came out with this hack to hide your online status from certain users.

facebook hack

It annoys when you get anonymous chat request when your status is online, many of us would go offline to simply avoid this issue. But now no worries, here is a hack which let you know how to block certain people from viewing your online status.

facebook hack

 Once you create a new list “BlockList“, click on edit in BlockList and select profiles of the users you need to block. If those users are appeared online just drag their name to the new list “BlockList“. After finishing this step, all you need to do is move your mouse over the green dot and click on “Go Offline“.

facebook hack

Now you had blocked your online status for certain people. Happy Facebooking.

ReBuzzThis An Alternative to Buzrr For Google Buzz Counter


Everyone is taking about Google Buzz these days, but I don’t know exactly whether its really created a Buzz. But it seems people started focusing on creating application for buzzing products. Following this foot steps is ReBuzzThis a portal, which talks about Google Buzz’s hot happenings as like Tweetmeme for Twitter.

rebuzzthis

ReBuzzThis wants to encourage blogs and website to integrate Google Buzz as their sharing tool. So for bloggers, tools like this will really help to share their conversation and ReBuzzThis has also introduced Buzz counter button for different blogging platform and websites, which they believe would bring more traffic and make them stand out in Buzzing community. Well, we wish best of luck for their service.

To know how to add Google Buzz for your Blogger / Blogspot blogs, check our previous post. We had also included some compact Buzz buttons to give a twitter counter feel for Buzz.

Social hub: How to integrate Facebook and Twitter in Gmail


Few days back Google released their new service called Buzz, which is really getting good response from users and stormed the Internet community with cool features. Buzz comes with Gmail integration, which makes Gmail users to access buzz without opening a separate window. So here I am going to teach, how to integrate Facebook and Twitter in Gmail.

twitter and facebook gmail integration

Integrate Facebook in Gmail

Adding Facebook gadget is pretty simple, as like the way you add other services gadget to gmail. There are many Facebook gadgets out in the wild, but I felt Facebook gadget by iBruno is good to go. So all you need is copy and paste the the below URL in Gmails gadgets setting. Enter the URL “http://hosting.gmodules.com/ig/gadgets/file/104971404861070329537/facebook.xml

facebook gmail integration

 
Integrate Twitter in Gmail

Twitter integration is exactly similar to what we learned how to add Facebook gadget. Follow the same step and enter this URL instead of the Facebook gadget URL.

“https://twittergadget.appspot.com/gadget-gmail.xml”


If you need further detailed integration of Twitter gadget in Gmail, check out my previous post on Twitter gadget integration in Gmail.

So ultimately it looks clear that Gmail looks to be the social hub, by making integration pretty simple with their website and trying to provide the flexibility to user. Overall Gmail has become social command center.

How to: Hide or Turn off Google Buzz from your Gmail


Everyone quite these days discussing about Google Buzz and its features, but there are few not satisfied with Buzz. Since it is a product from Google, they had integrated Buzz with Gmail. So If you are an Gmail user, who don’t like to see Buzz in Gmail, then this trick is for you. Here I am using filters to avoid listing Buzz in Gmail, may be some of us aware of this service in Gmail.

1. Hit on Create a filter and enter label:buzz in the Has the words text box. Then click Next Step button

2. Now tick the checkbox – Skip the Inbox and hit on Create filter button.

Now your Gmail is Buzz free. If you want to search for Buzz notifications use label:buzz. Actually there is another way of turning off the function. All you need to do is just hit on Turn off Buzz. Voila, turn on Buzz, by just hitting on the link once again.

Creative Advertisements Of The Decade


Creating an advertisements involves lots of effort, especially to make it creative it requires even more. Advertisements are believed to be grabbing people’s attention to the product. This idea remained constant more than a decade, which led to the creation of fabulous and mind blowing advertisements. Every year advertisement industry has seen enormous growth, this proves the successful journey. So lets have a look at creative advertisements of the decade.

Google Street View

 
Google Street View

Firefox – Always use protection

Firefox - Always use protection


The power of Viagra

Viagra

Mini

Mini

Nike – Just do it

Nike

Samsonite

Samsonite

Bernmobil – Airport bus

bernmobil

Durex

Durex

Canon

Canon

Pedigree

Pedigree

Pocket pries

pocket pries

Jobsintown.de

jobintown

Monster.com

monster.com

Against child abuse

against child abuse

Moserbaer

Moserbaer

Windex

Windex

Match.com

Match.com

Powerbar

Powerbar


Funny Stuff

Man Behind This Blog

Krrish, currently doing his study, is a part time blogger from Delhi, India.

His areas of Interest are Computers, HTML, Web Designing WordPress and Blogger.

He Loves to work on WordPress, Blogger, PHPBB3, MYBB etc and helps others with Tips and Tricks to make successful websites..

At 99B-Everything About Blogging, he writes about Blogging, SEO, Blogger Tutorials,WordPress Tutorials, Blogger Templates and Making Money online.
He Also Provide services in WordPress Installation, Thesis Theme Customization, Link Building and more..(Portfolio Website coming Soon)
Get Traffic to Your Blogs Free- "Sign Up Today Free... "